The Wishlist template allows you to create a dedicated page where users can view and manage their saved products. This is integrated directly into the WordPress page settings, allowing for a seamless connection between your e-commerce functionality and the site layout.
Create the Wishlist Page #
First, you must create the physical page in WordPress that will serve as the wishlist destination:
- Navigate: Go to Pages > Add New in your WordPress dashboard.
- Set Title: Enter a name for the page, such as “My Wishlist” or “Favorites”.
Assign the Wishlist Template #
To ensure the page functions correctly as a wishlist and uses the theme’s pre-defined styles, you must assign the specific template in the Page Settings:
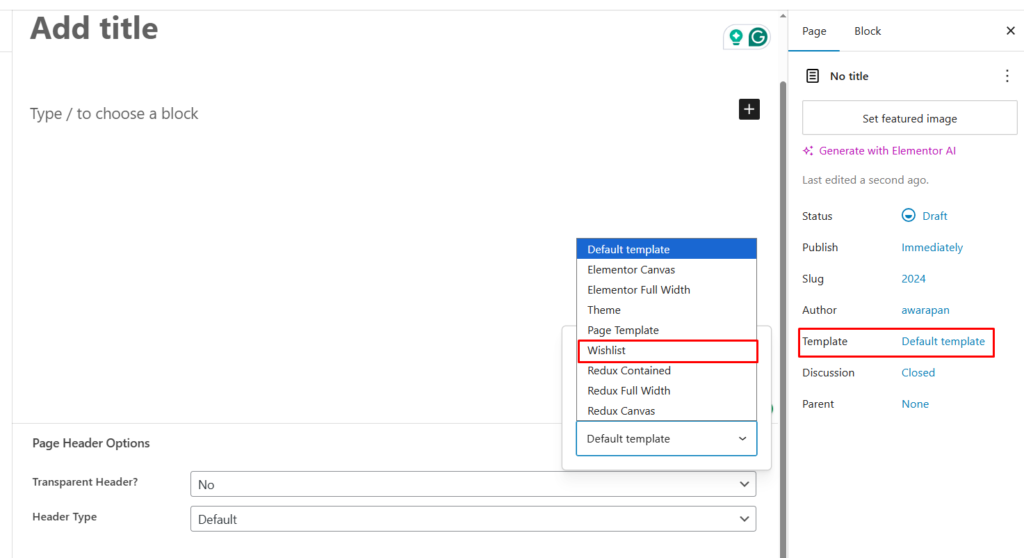
- Open Page Settings: On the right-hand sidebar of the WordPress editor, locate the Summary or Page tab.
- Locate Template Selection: Find the Template dropdown menu, which typically defaults to “Default template”.
- Select Wishlist: Choose Wishlist from the list. Once selected, this page is programmed to automatically fetch and display the products a user has favorited.
- Publish/Update: Click the Publish or Update button at the top right to save your changes.
Metaboxes #
Once you select the Wishlist template from the page attributes, a specialized set of configuration panels called Meta Boxes will automatically appear below the main editor area. These options allow you to fine-tune the header and hero sections specifically for your wishlist page without writing any code.

Page Header Options #
This panel controls the initial behavior of the header on the wishlist page:
- Transparent Header?: Use the dropdown to enable or disable a transparent effect for your site’s main navigation.
Page Hero & Styles #
These settings control the “Hero” banner area, including title and breadcrumb displays:
- Page Hero Section: Toggle to Show or Hide the entire banner area.
- Hero Content Alignment: Set the alignment of titles and breadcrumbs (e.g., Space Between, Center, or Left).
- Page Hero Title: Toggle the visibility of the “Wishlist” title text.
- Show Breadcrumb: Choose whether to display the navigation breadcrumb trail.
- Page Hero Height: Manually set the vertical height of the hero section in pixels (e.g., 130px).
- Page Sidebar: Determine if the content should be full-width or include a Right Sidebar or Left Sidebar.
- Override Global Style?: If set to Yes, you can manually define custom background images and overlay colors for the hero section.
Important Note #
[!IMPORTANT] By default, the Wishlist page follows your global Theme Options. Adjusting these Meta Boxes creates a local override for this page only. Unchanged fields will continue to pull data from the global configuration.
[!TIP] These Meta Box options only become visible and active once the Wishlist or Page Template is selected in the Template dropdown. If you switch back to the “Default template,” these specific controls will disappear from the editor view.